السبت، 13 مارس 2010
Conover 16" Wood Lathe

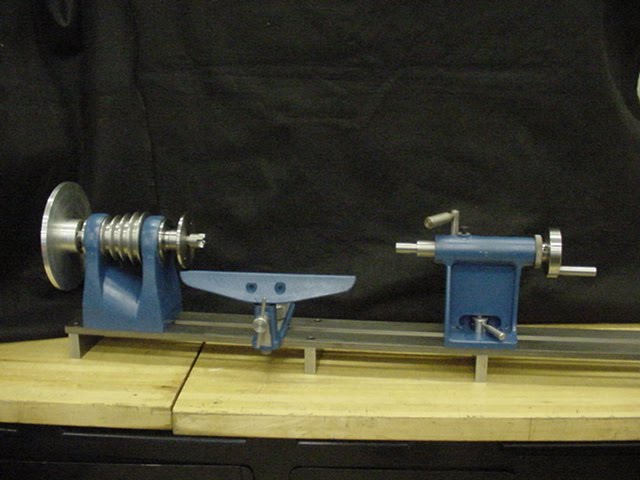
The Conover wood lathe featured heavy cast iron construction, precisely machined,
produced a lathe with 16" swing (up to 20"). The lathe featured a user supplied 2" x 6" timbers for the bed.
I purchased the Conover Lathe components locally. It did not include the bed or stand so
I built my own. The bed is made from 2x6 pine with 1 1/2" angle iron for bed ways
Legs are made from 2"x2" square steel.
The Conover Lathe was made in the USA until 2002 and is a true work of art!
Read more...
China Wood Lathe machine
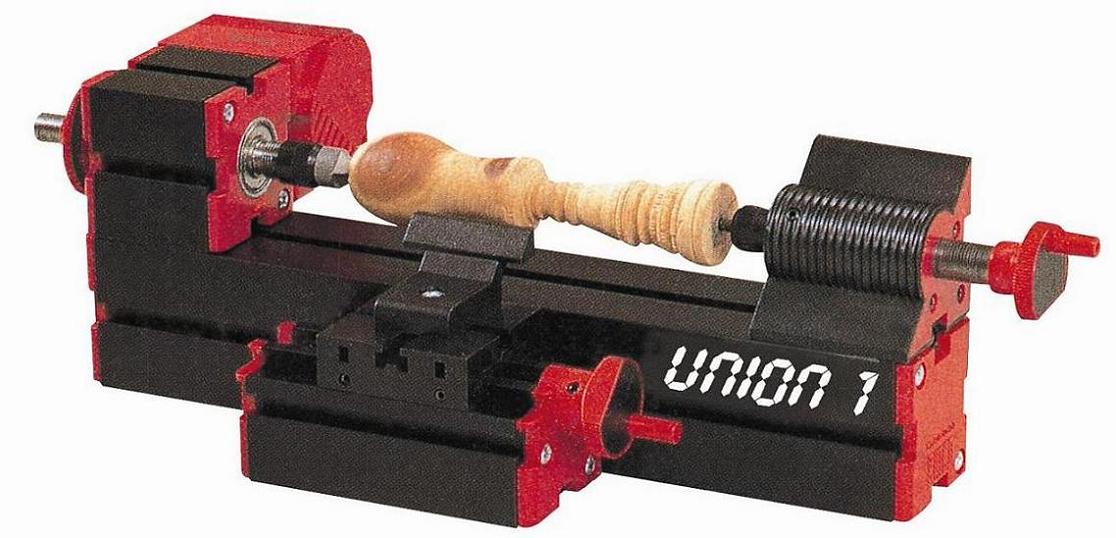
Product Description Technique Data:
1) Motor speed: 20, 000rpm
2) Headstock speed: 2, 000rpm
3) Motor input: 14.5VDC / 2000mA
4) Max. Cutting diameter: 45mm(bigger diameter is possible with intermediatepiece)
5) Center distance: 135mm(with accessories extra long machine bed can longer to 360mm)
6) Material: Carbon steel, Aluminum, ABS
7) All types of wood (also hard wood) can be processed
8) Recommended types of wood: Lim wood, birch, maple, pear tree, cherry tree (medium hard), beech tree, oak (hard) and so on.
9) Every suitable chisel and gouge can be used
10) Maximum measurements on 3D(cm L/W/H): 28/10/10
11) Net weight: 1.28kg
Company: Shenchuang Electronic Co.,Ltd.
Read more...
Lathe tools

Lathe tools are called knives or chisels, sometimes interchangeably. They feature long, round, curved handles to afford a solid grip and sufficient leverage to enable the turner to control the cutting edge accurately with minimal fatigue. Common wood chisels simply are too short and are ill-designed for this purpose. Here are a few of the many types turning tools you may find:
How to Use a Wood Lathe

Wood lathes can be used to create functional furniture components, beautiful decorative wood projects such as candlesticks and bowls, or even toys such as tops and yo yos. These machines range in size from hobby models that fit on a work bench to large industrial-sized machines weighing hundreds of pounds, but they all share some basic elements.
Here are some instructions for using these unique machines.
Steps

Select a lathe suitable for your project. Bench top lathes can be ideal for turning small projects like ink pens and yo-yos, larger machines may be used for making spindles used in furniture and handrail styles. Here are some differences in wood lathe specifications:
Bed length is the distance between centers, or the maximum length of the stock that can be turned.
Swing is the term used to describe the largest diameter stock that can be turned.
Horsepower is the amount of torque the lathe motor develops, which in turn will determine how heavy an item can be turned without overloading this critical component.
RPMs are the revolutions per minute the stock can be turned. Here, note that most, if not all lathes have variable speed capabilities. A lathe with a very low speed range allows the user to start a piece of odd shaped, unbalanced stock without excessive vibration, and high speed machines can speed the work while making obtaining a fine, smooth finish easier to achieve.
Weight and composition. Heavier machines with cast iron beds and steel frames offer a good, solid work platform, but can be difficult to move if you are operating it in a crowded workshop where you will be storing it when it is not in use.

Select the correct cutting tools for your objective. Lathe tools are called knives or chisels, sometimes interchangeably. They feature long, round, curved handles to afford a solid grip and sufficient leverage to enable the turner to control the cutting edge accurately with minimal fatigue. Common wood chisels simply are too short and are ill-designed for this purpose. Here are a few of the many types turning tools you may find:

Gouges. These usually have specially shaped cutting edges for performing particular cuts, such as bowl gouges, with concave, curved cutting edges to form the smooth, curved surface of a bowl, or vee, or knurling gouges for cutting grooves or knurls in wooden spindles.
Scrapers. These are often flat or slightly curved chisels for removing wood from flat or cylindrical shapes, or for roughing out a shape. Parting tools. These are thin, vee tipped tools for cutting off work pieces.
Spoon cutters have a spoon shaped cutting edge and are also often used for shaping bowls.
Other tools you may encounter are skew chisels, fluted gouges, spindle gouges, and nose chisels.
3- Learn the components of your lathe. A basic wood lathe consists of a bed, headstock, tailstock, and tool rest. Here are the functions of each of these parts.

The headstock consists of the drive train, including the motor, pulleys, belts, and spindle, and for a right handed turner, will be located on the left end of the lathe. Mounted on the end of the headstock facing the tailstock is the spindle and the spur center or for face turning such as
bowls and plates, or other flat or face work, the face plate assembly.

The tail stock is the free spinning end of the lathe, and has the tailstock spindle and the cup center, as well as a hand-wheel or other feature for clamping or securing the work piece between the lathe centers.

The tool rest is similar to a mechanical arm with a metal guide bar to support the chisel or knife used for turning the work piece. It usually can be adjusted by sliding the length of the bed at its base, with an intermediate arm that can swing from a parallel to a perpendicular position in relation to the lathe bed, and the upper arm, which holds the actual tool rest bar. This assembly has as many as three swivel joints, all of which tighten with a setscrew or clamp to keep it secure while turning is in progress.
Read your owner's manual before proceeding with actual lathe work for specific instructions, features and detailed safety instructions. Keep your owner's manual handy for reference if you decide to purchase accessories for your particular lathe, for maintenance instructions, and for reference to capacities and specifications for your machine.
Choose the lathe operation you are going to begin with. A simple task might be to turn a square or irregularly shaped piece of wood to a truecylindrical shape, often the first step to forming a spindle or other round item.
Select a suitable piece of wood for your project. For a beginner, using a softwood like southern yellow pine, lodge-pole pine, or balsam fir may be a good idea. Look for a piece with fairly straight grain, and few, tight, knots. Never turn a split piece of stock, or one with loose knots, these may separate during turning, and become projectiles traveling at a significant speed.
Square the stock. For example, if you are going to begin with a piece of 2X4 lumber, rip it to a nominally square shape, such as 2X2. You can then chamfer, or bevel the square corners, effectively creating an octagonal piece, which will reduce the amount of wood that must be removed to reach your desired cylindrical shape.
Cut the stock to the desired length. For a beginner, starting with a relatively short length, less than 2 foot long for an intermediate, or medium sized lathe, is a good choice. Longer work pieces are difficult to true, and maintaining a uniform diameter along the length of a longer piece can take a lot of work.
Mark the center of each end of your stock, and position it between the lathe centers. Assuming the tailstock is not locked in position, slide this until it pushes the cup center into the tail end of your work piece. Using the hand crank, tighten the tailstock spindle so that it pushes the stock into the spur center, mounted on the headstock spindle. Make sure the work piece is securely held, and all clamps are tightened, otherwise, the work piece may fly off the lathe while you are turning.

Position the tool rest parallel to the length of the work piece, keeping it far enough back to allow the work piece to rotate without hitting it, but as close as possible. A good working distance is about 3/4 of an inch. Remember, the closer the tool rest is to the turning work piece, the more leverage and better control you will have with your knife (chisel).
Free spin, or hand turn the work piece to make sure it doesn't hit the tool rest. It is a good practice to always turn a work piece by hand before turning the lathe on, making sure it has sufficient clearance.
Choose the knife you will use for the turning operation. A roughing gouge is a good choice for beginning to turn an irregular or square work piece down to a round shape. Practice holding the knife on the tool rest, using your left (again, for right handed persons) hand on the metal blade behind the tool rest, and your right near the end of the handle. Keeping your elbows in, and braced against your body will give you better control of the tool.

Turn the lathe on, making sure it is at the lowest speed setting. Place the cutting edge of the tool on the rest, keeping clear of the rotating work piece, check your grip, and slowly begin easing it toward the work piece. You want to
move in toward it perpendicular to the work piece, until the cutting edge just touches the wood. Forcing it or moving too quickly will cause the tool to jam into the wood, and it will either break off, or you will lose your grip on the tool if the lathe doesn't stall out. This is one of the most dangerous steps in beginning turning.
Feel the resistance of the cutting edge and watch the size of the chips being cut from the work piece. When truing, you will want to cut small chips, less than 1/4 of an inch in length.
Begin moving the cutting edge parallel to the rotation of the work piece, continuing to make a light cut along its length. When using a roughing gouge or similar tool, you cancant, or pitch the tool edge so chips are thrown at an angle from the work piece, so you do not become covered with them while you turn. Twist the tool slightly and observe the flight path of the chips to adjust it so they fly away from you to your right or left.
Continue pushing the tool into the stock gradually, in passes, so that you remove a roughly equal amount of wood with each pass. This will eventually cut away the angular corners, leaving your work piece round, and with practice, cylindrical in shape.
Stop the lathe frequently when you are just beginning, to check your progress, look for stress cracks in the wood, and clear debris which may begin to accumulate on the lathe bed. You may want to use a pair of calipers to check the diameter of your work piece along its length so you finish with the desired diameter.
Smooth the finished round work piece by increasing your lathe speed, and holding your cutting tool so it barely contacts the wood, then moving it slowly along the work piece’s length. The slower your tool movement, and finer, or lighter the cut, the smoother the finished cut will be.
Sand the work piece when you are finished cutting if desired. You can sand the stock by hand while it is turning if you use caution. Turn the lathe off, and swing the tool rest out of the way, then select a suitable grit and type of sandpaper for this process. Turn the lathe back on, and hold the paper lightly against the wood, moving it back and forth to prevent removing too much wood from one area of the work piece.
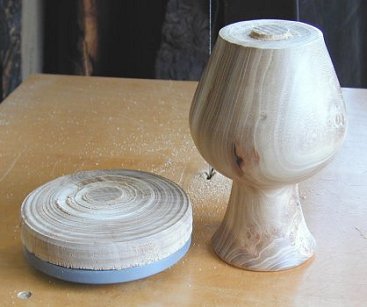
Wood turning work step by step

Trimming the bark: Bill trims an Elm greenwood log for hollow vessel turning. The elm tree was cut down in Lafayette California because it was interfering with electrical power lines.

Mount the wood on the lathe: The turning blank is mounted with faceplate and live center in the tail stock. The blank diameter does not allow room for the tool rest on the lathe bed to be used so an auxiliary tool rest is used clamped to the lathe table.

Reduce Speed: Homemade "jack shaft" speed reducer cuts the lathe speed to about 400 rpms. The reduced speed is sometimes necessary for unbalanced turnings. The lower speed seems to work fine for all round turning and sanding as well

Rough turned cylinder:The turning blank is rough turned to a cylinder shape and is ready for exterior shaping.

Shaping the exterior: The tool rest is removed to better display the exterior shape of the soon to be hollow turning.
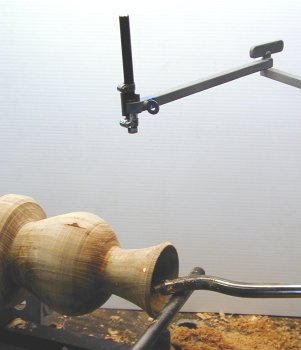
Hollowing begins: The laser light is shown on the lip of the vessel as the cutting tool moves in the opening.
wood lathe workes part 2
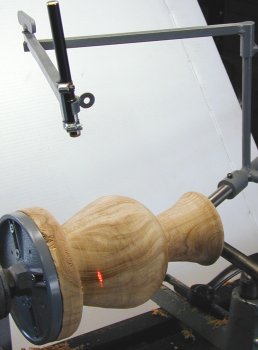
End hollowing: The cutting tool is nearing the bottom of the vessel and the laser light shows that the turning is approaching the final wall thickness

Cutting the bottom: The hollowed vessel showing the parting tool cut leaving about one inch diameter connection with the faceplate mounted blank end. At this point the vessel is removed from the lathe remaining attached to the faceplate and allowed to dry for a couple of days. The vessel bottom dries better if parted in the fashion shown.

Sanding the exterior: After drying for a couple of days the vessel is remounted on the lathe for final exterior sanding using a foam pad drill mounted sander. Sandpaper is used to sand in the vessel opening as far as one can reach. Final sanding is done using up to 600 grit sandpaper
Remove from faceplate: The hollow turning is band sawed free of the wood base and faceplate

Carve bottom: An air die grinder and power carver is used to remove the bottom attachment. The bottom of the vessel is allowed to dry for a day or two.

Sand bottom: The vessel bottom is now sanded with a foam sander.
Lathe Dust Hood

Lathe dust collection has never been easier! Hood assembly features a hinged viewing shield that can swing up and out of the way. Includes convenient mounting bracket that allows easy installation onto many different styles of lathe. For use with 4" hose.
Read more...
Wood-Working
Timber was the most important resource for the Anglo-Saxons and Vikings. The early medieval carpenter was not only skilled in working the wood, but also in selecting the correct timber and shape for the job. If the finished item needed to have a curve in it, the carpenter would select a piece of timber that had the correct natural curve. You can use natural junctions where a branch joins to the tree as joints that have grown to suit a job that you had in mind. These natural joints are stronger than man-made ones and save the carpenter a lot of time creating joints. Wherever possible they would 'follow the grain' to leave the finished product as strong as possible.
To a certain extent, all the peoples who lived then managed their woodlands, although if a tree needed to come down for a building let's say, as far as we know they didn't replant to replace that tree deliberately. A thousand years ago, trees were still a resource that would have seemed limitless. It takes for example over 80-90 years for an Oak tree to become large enough to be useful. Large scale timber production had yet to make the impact it would later. A large stand of trees felled would just be providing clearance for yet more farmland. The Vikings are regarded to some extent today in Iceland as 'environmental terrorists', as they eventually felled all of the trees that had once grown there. The Iceland we see today has been irrevocably changed due to their habits.
A great deal of Saxon and Viking woodwork was done 'green,' that is the timber was not seasoned (dried out over time) before working. This meant that the timber could be split easily (green oak can be split with a seasoned wooden wedge), and need not be sawn. The big advantage of using cleft (meaning split) timber is that it is less likely to crack as it dries.
Most of the 'roughing out' and shaping was done with axes and adzes. The saw has obvious advantages. It can cut out a straight piece of timber every time, splitting can result in planks that are twisted etc. But the trouble with saws was that they were very expensive and difficult to maintain and make. At the time of the Domesday Book in 1086, only 13 saws were recorded in the kingdom. These were probably large saws for what is called 'ripping' down the beam of timber to create planks, as much smaller bow saws are routinely shown in manuscripts.
The trimming and shaping with Adzes and Axes is quite a wasteful process as well. With saws, large pieces of wood can be separated from the job at hand, leaving you with a reasonable piece of wood that can be utilised for other smaller jobs. The Adzes and Axes just convert the unwanted timber into pieces only suitable for the fire. However, the bark would be stripped off for the tanners, as it contains tannin, especially if the tree had been an oak, alder or elm, and the bast fibres that lie just under the bark would also be pulled off to make rope and other ties. Willow, lime and again oak trees give some of the most useful bast fibres. And ultimately, any left over timber could be used in the Charcoal making process, or just burnt to keep the workers in the woods warm in the Autumn.
The largest pieces of wood working done during the Saxon period must have been for the buildings. Timber was also used for ships, musical instruments, coffins, bridges, roads/paths and many more mundane items as well.
It has only been since the major excavations like those at Hedeby, Birka, Dublin and York that archaeologists have been able to understand how often wood was used in the home. The waterlogged and anaerobic (lacking in oxygen) environment at these sites has yielded many finds in surprisingly good condition. Cups, bowls, spoons, and plates came in many sizes and were used in the home for storage as well as eating. Buckets, barrels and tubs were made from planks of wood bound with metal or withy hoops. Butter churns, cheese presses, trays, gaming boards and pieces, boxes and chests have been found too. Looms, beds, tables, chairs, stools and benches were made of wood as well.
Most tools had wooden handles. Rakes, spades and agricultural forks were also made from timber. Spearshafts, bows and shields were wooden too. Simple boats were made using the 'dug-out' method of construction. Ploughs, sleds, carts and wagons were all made of wood. It's difficult to think of much that was made then that wasn't made of wood.
Almost everyone employed the carpenter's skill in some way, from fishermen and weavers to shoe-makers. Shopkeepers and traders used wooden sticks with deep notches cut in them to keep their accounts. These were known as 'tally sticks', and recorded how much of an item had been purchased. It was split nearly in two down it's length and as a you counted off the sold or purchased items, you broke off a tooth of wood. When the deal was finalised, half of the tally stick went to the purchaser, and you kept the other half as a permanent record.
To shape cups and bowls the woodworker would have used a 'pole lathe'. The power to rotate the spindle and the balk of timber to be worked was created by pumping the treadle down, and letting the springiness' of the pole rotate it back again. The cutting was done on the down stroke when you provided the power. A skilled lather could produce some very fine pieces of turned work. Some finds of worked wood from York have suggested that the pole lathe was the most likely way that they made turned items such as cups. Sadly though, a complete or part lathe has yet to be found in association with the cups and bowls that have been excavated at sites like York. To date practical experimentation has demonstrated that pole lathes are the most likely manner to make such items.
They would also have used tools such as planes, axes, adzes, draw knives, wedges, knives, chisels, hammers, mallets, awls, gouges, and spoon augers (a type of drill). Saws were known, but were not generally used, perhaps because they were difficult to make, comparatively frail and are not as good when used on green wood, especially when a split piece would suffice.
The whetstone would have been a important possession for the woodworker as, without it, he could not have sharpened any of his tools. These were made from Gneiss, a type of Granite for the 'rough' grinding of blades, to the much softer banded Slates (selected for their elegance and the colour of the bands in the slate). The former could come from Telemark in Norway and the latter from the Lake District in northern England, although many other grades and types of stone were also used. Also different shapes were necessary for the variety of shaped blades used in detailed woodworking.
The name 'whetstone' comes from the practice of grinding an edge on a blade, even on a sword for example using water to 'wet' or 'whet' the edge. Sometimes the name 'slipstone' is also used to describe a similar thing. The advantage of water is that it won't stain your woodwork unlike oil can, and it's cheap - many people who sharpen tools often spat onto the stone to lubricate it.
Much of the Anglo-Saxon and Viking woodwork was ornately carved and invariably painted or decorated in some way. Some of the items surviving may well have taken much longer to decorate than they did to construct.
Another form of wood-working was basket weaving. This was done with thin strips of wood and bark, fine branches from trees such as hazel or willow withies, and reeds. Even grasses were employed for smaller basketry and the production of mats. While not much basket work has survived from the period (impressions of wattle are sometimes left in daub), due to the fact that the organic material degrades very quickly, there is ample evidence from period illustrations of baskets and wattle hurdles. In fact many of the terms used in basket weaving today are from the Old English.
How to Use a Mini Copse Lathe

Designing Handcrafted Custom Autograph Pens
Read added at Suite101: How to Use a Mini Copse Lathe: Designing Handcrafted Custom Autograph Pens
Designing and axis handcrafted copse autograph pens on a lathe has become a admired accomplished time for copse enthusiast aback the average of the 20th-century. The final adorableness of the autograph pens are an accomplished chat allotment and are bound acceptable ancestors heirlooms, which will be anesthetized from bearing to generation.
Tools and Equipment Required For Pen Turning
Designing autograph pens requires some basal woodworking tools, such as a mini lathe, assignment press, and a Pen Assembly Press. It additionally takes an Oval Skew Chisel, a Spindle Gouge, and a Parting Tool. Although the pen maker can, duke carve the pens and assignment the centers on a assignment press, it is far easier to use a multi-speed mini lathe, giving the pen maker abounding ascendancy over the conception of axis the pen.
Preparing the Pen Blanks
Mark and analyze the top and basal of the pen blank. The copse turner should additionally attending for any absorbing atom designs, or defects in the pen bare that could account the pen banal to able or aberration aback turning. Once the pen bare has been marked, cut it in two on a bandage saw.
The additional footfall in authoritative a pen is conduct the pen blank. Align the pen bare with the assignment bit, in the assignment press. The bore of the assignment bit is bent by the admeasurement of the automated belly of the pen actuality created.
Use an awl to announce the centermost of the pen blank. Assignment appear the end of the cap or basal of the pen blank. The assignment acceleration should circle at 500rpm. The pen maker should go boring as they abreast the end of the pen blank, so not to assignment all the way through.
Read added at Suite101: How to Use a Mini Copse Lathe: Designing Handcrafted Custom Autograph Pens
Gluing the assumption pen tube, and account the assumption tubes with a 120 or 150-grit sandpaper. Administer some cement to the arch bend of the assumption tube; a 5-minute adhesive will assignment best. Set abreast for about 20 account to assure the cement or adhesive is absolutely cured.
Turning the Copse Pen on the Lathe
Place the pen on the lathe with the top of the pen at the arch of the lathe. First, annular the ends of the bare to abreast the bushing bore with a ½-inch Skew. Once the bore is reduced, the pen turner will alpha alive from the centermost to the edges of the pen in continued connected distinct passes.
Shaping the pen bare is done with a 3/8-inch Spindle Gouge. The pen turner will cut from the edges into the centermost of the pen bare to accord it a asperous shape. If the pen bare has blemishes or chips, the pen maker should accomplish aliment with a admixture of adhesive and pen balance of the aforementioned blank.
Using average emery sandpaper, the pen maker will wet beach the apparent of the pen. Affective from a average dust to a accomplished dust paper, and charwoman the apparent amid anniversary pass, to ensure there is no body up of sanding dust. To abstain sanding scuffs on the surface, accumulate the sanding cardboard affective and accumulate the edges of the sanding cardboard abroad from the surface.
Finishing the Copse Pen Set
To abolish any apparent scratches, the pen maker will administer micro cutting adhesive to the pen bare with a apple-pie cloth. With the lathe running, accumulate the bolt affective aback and alternating beyond the pen blank. Backlighting the activity will acquiesce the pen maker to see area on the apparent needs added polishing.
Assembling The Handcrafted Board Pen
The final footfall is accumulating the accomplished pen. The pen brand will abode the top and basal sections of the pen assimilate the Pen Assembly Press. Starting with the top area columnist the automated pieces of the pen into the top and basal accomplished pen blanks. Once the automated belly accept been inserted, the pen is accumulated and accessible for use.
Wooden pen sets booty on the personality of the copse turner, and anniversary pen set will appearance the adulation the copse adept acclimated to actualize them. They are best stored in custom board boxes, with the date of the conception and the name of the copse enthusiast’s name engraved on the basal of the pen box. If the copse enthusiast does not accept a copse lathe, again apprehend this commodity on application a assignment columnist to accomplish copse pens.
Read added at Suite101: How to Use a Mini Copse Lathe: Designing Handcrafted Custom Autograph Pens
Wood Lathes

When a alpha woodworker, you best acceptable aren't yet able for a copse lathe. Having said that, if you accept are at the point in your copse alive area you are austere about outfitting the boutique with the appropriate accoutrement possibly this apparatus is absolutely one you should consider.
The basal operation of the apparatus is accessible to understand; you abode your assignment account it the lathe and it spins around. You again use tools, like gouges and chisels to advice carve the wood. That actuality said though, there is added to the apparatus that this. Copse lathes alter in capital appearance like horsepower, bed size, swing, additional set or adjustable revolutions per minute(RPM) . A main, although oftentimes ignored, affection is the chuck. This is the allotment that secures our copse in abode while it turns. You will appetite to accept the advantage of captivation the copse amid the aperture of the abandon or blame the assignment account appropriate on to the chuck. This is accessible for disconnected you will be captivation by alone one end, such as a copse bowl. Your accurate needs care to actuate what of these capabilities will be must-have for you.
Like abounding ability equipment, there are assorted labels to accept from. Best of these makes will apparently be able-bodied accepted to you: Delta, Craftsman, Ohio Forge, Grizzly, Jet, Oliver, Glaser, Rikon, Stabilax, Powermatic, Supernova, and alike Tranpower. You about absolutely accept got your admired manufacturer, about you'll appetite to attending into comparisons so that you accomplish abiding you get the capabilities you require. Your copse lathe isn't a baby purchase, for this acumen try to do your appointment afore purchasing.
Turning a Baby Cradle
cradle is a traditional baby holder. It's designed to hold the baby while you have your hands full. Often it has rockers so that you can get a little motion going to help keep the baby occupied and maybe even convince them to sleep.
Creating a cradle from wood turning components is a very satisfying project. If you've got a child or a grand-child coming, this might be the project for you!

In this project, JoHannes Michelsen shows us how he made a baby cradle for his new grandson.
He takes us through all the steps needed to create the legs, the base, the spindles and the rails. Then he assembles the crib using these components to make one of the most stunning cradles we've ever seen!
You may never made a cradle yourself but following this project will give you a great appreciation of the work and dedication that were involved in making this baby cradle.
